Difference between revisions of "Profiling OpenKM"
| (6 intermediate revisions by one other user not shown) | |||
| Line 11: | Line 11: | ||
</source> | </source> | ||
| − | {{Note|The '''java.rmi.server.hostname''' should match the IP of the remote server, so replace '''127.0.0.1''' by the right IP.}} | + | {{Note|The '''java.rmi.server.hostname''' should match the internal IP of the remote server, so replace '''127.0.0.1''' by the right IP.}} |
In order to connect to this remote Tomcat instance, go to '''File > Add JMX Connection...''' and fill the hostname and port. In this case the port is 9090 but you can set another one using the '''com.sun.management.jmxremote.port''' property. | In order to connect to this remote Tomcat instance, go to '''File > Add JMX Connection...''' and fill the hostname and port. In this case the port is 9090 but you can set another one using the '''com.sun.management.jmxremote.port''' property. | ||
| Line 42: | Line 42: | ||
=== Monitoring Remote JVM Over SSH === | === Monitoring Remote JVM Over SSH === | ||
| − | + | The easiest way to connect to the remote JMX is to use a [http://en.wikipedia.org/wiki/SOCKS SOCKS proxy]. | |
| − | $ ssh -D 8888 | + | $ ssh user@external.server.ip -D 8888 |
You need to configure VisualVM to use this proxy. Go to '''Tools''' > '''Options''' > '''Network''' and edit '''Manual Proxy Settings'''. Configure SOCKS Proxy at ''localhost'' and port ''8888''. | You need to configure VisualVM to use this proxy. Go to '''Tools''' > '''Options''' > '''Network''' and edit '''Manual Proxy Settings'''. Configure SOCKS Proxy at ''localhost'' and port ''8888''. | ||
| + | |||
| + | |||
| + | [[File:Visualvm proxy.png|500px|center]] | ||
| + | |||
Now you can connect VisualVM to the remote target. Go to '''File''' > '''Add JMX Connection...''' and type the IP or hostname of the remote machine and the configured JMX port (in our sample configuration is 9090). | Now you can connect VisualVM to the remote target. Go to '''File''' > '''Add JMX Connection...''' and type the IP or hostname of the remote machine and the configured JMX port (in our sample configuration is 9090). | ||
| + | |||
| + | |||
| + | [[File:Visualvm jmx.png|360px|center]] | ||
| + | |||
More info: | More info: | ||
| Line 78: | Line 86: | ||
[[Category: Developer Guide]] | [[Category: Developer Guide]] | ||
| − | |||
Latest revision as of 19:45, 12 December 2012
You can profiling local and remote Java applications using Java VisualVM. For local application is easy because it detect automatically them and show in the listing. For remote application you need to do a little work.
First of all add this line to $TOMCAT_HOME/bin/setenv.sh file (or setenv.bat if using Windows):
CATALINA_OPTS="$CATALINA_OPTS -Dcom.sun.management.jmxremote=true"
CATALINA_OPTS="$CATALINA_OPTS -Dcom.sun.management.jmxremote.port=9090"
CATALINA_OPTS="$CATALINA_OPTS -Dcom.sun.management.jmxremote.ssl=false"
CATALINA_OPTS="$CATALINA_OPTS -Dcom.sun.management.jmxremote.authenticate=false"
CATALINA_OPTS="$CATALINA_OPTS -Djava.rmi.server.hostname=127.0.0.1"
| The java.rmi.server.hostname should match the internal IP of the remote server, so replace 127.0.0.1 by the right IP. |
In order to connect to this remote Tomcat instance, go to File > Add JMX Connection... and fill the hostname and port. In this case the port is 9090 but you can set another one using the com.sun.management.jmxremote.port property.
Authentication
To enhance security, enable authentication:
CATALINA_OPTS="$CATALINA_OPTS -Dcom.sun.management.jmxremote.authenticate=true"
CATALINA_OPTS="$CATALINA_OPTS -Dcom.sun.management.jmxremote.password.file=$CATALINA_HOME/conf/jmxremote.password"
CATALINA_OPTS="$CATALINA_OPTS -Dcom.sun.management.jmxremote.access.file=$CATALINA_HOME/conf/jmxremote.access"
Edit the access allow file $CATALINA_HOME/conf/jmxremote.access:
 monitorRole readonly
 controlRole readwrite
| To show remote threads you need the readwrite permission. |
Edit the password file $CATALINA_BASE/conf/jmxremote.password :
 monitorRole tomcat
 controlRole tomcat
And finally, restrict access to these files:
 $ chmod 600 $CATALINA_HOME/conf/jmxremote.access
 $ chmod 600 $CATALINA_HOME/conf/jmxremote.password
Monitoring Remote JVM Over SSH
The easiest way to connect to the remote JMX is to use a SOCKS proxy.
$ ssh user@external.server.ip -D 8888
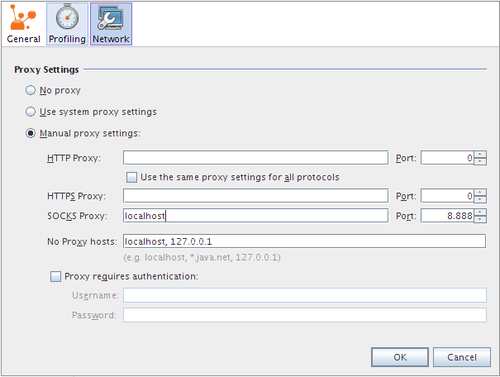
You need to configure VisualVM to use this proxy. Go to Tools > Options > Network and edit Manual Proxy Settings. Configure SOCKS Proxy at localhost and port 8888.
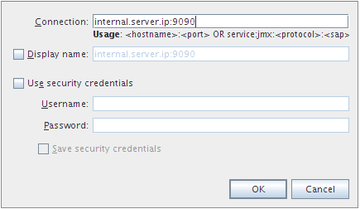
Now you can connect VisualVM to the remote target. Go to File > Add JMX Connection... and type the IP or hostname of the remote machine and the configured JMX port (in our sample configuration is 9090).
More info:
- Profiling With VisualVM, Part 1
- Profiling With VisualVM, Part 2
- Connecting Visual VM to Tomcat 7
- Monitoring and Managing Tomcat 7
- Remote Profiling of JBoss using VisualVM
- Troubleshooting application performance with VisualVM
- Monitoring of Tomcat with VisualVM and VisualGC
- Using VisualVM to fix live Tomcat and JVM problems
HPROF
Java includes HPROF, a profiler which collect application runtime information. HPROF is capable of presenting CPU usage, heap allocation statistics, and monitor contention profiles.
For example, can collect CPU usage information by sampling threads. Add this line to $TOMCAT_HOME/bin/setenv.sh file (or setenv.bat if using Windows):
CATALINA_OPTS="$CATALINA_OPTS -agentlib:hprof=cpu=samples"
When Tomcat starts you can see a file called java.hprof.txt. The CPU profiling info will be dumped to this file once Tomcat process is stopped.
More info:

