Difference between revisions of "Stapling"
| (3 intermediate revisions by one other user not shown) | |||
| Line 3: | Line 3: | ||
'''Restrictions:''' | '''Restrictions:''' | ||
| − | * Only stapling creator has privileges to add / delete more elements or deleting entire group. | + | * Only the stapling creator has privileges to add / delete more elements or deleting entire group. Other users only have downloading option. |
* Mails can not be downloaded. | * Mails can not be downloaded. | ||
| − | * If some users | + | * If some users have no rights to download some document in a stapling, although they can see it in the stapling group, they cannot download that file. |
| Line 11: | Line 11: | ||
* [[File:Stapling.gif]] → Start new stapling group / Staple element ( same button has both functions ). | * [[File:Stapling.gif]] → Start new stapling group / Staple element ( same button has both functions ). | ||
* [[File:Stapling_stop.gif]] → Stop stapling group. | * [[File:Stapling_stop.gif]] → Stop stapling group. | ||
| + | * [[File:Delete.gif]] → Delete some element in the group. | ||
| − | == Add new | + | == Add new stapling group == |
| − | First select some folder, document or | + | First select some folder, document or email. |
| − | {{Note| Folder, document or | + | {{Note| Folder, document or email must be selected in file browser view.}} |
| − | Click on [[File:Stapling.gif]] start new stapling group icon ( at bottom right | + | Click on the [[File:Stapling.gif]] start new stapling group icon ( at the bottom right will appear the message '''"Stapling started"'''). |
| + | |||
| + | Then select another folder or document and click again on the same icon [[File:Stapling.gif]]. Both elements are now stapled. | ||
| + | |||
| + | Continue selecting new elements and clicking on the same icon [[File:Stapling.gif]] to increase the number of elements stapled. | ||
| + | |||
| + | To finish, click on the [[File:Stapling_stop.gif]] stop stapling group icon ( at the bottom right will appear the message '''"Stapling finished"''') | ||
| + | |||
| + | |||
| + | == Add more elements to a stapling group == | ||
| + | Click on the "Add" button in order to select which group you want to add more elements to ( at the bottom right will appear the message '''"Stapling started"'''). | ||
| + | |||
| + | Continue selecting new elements and clicking on the same icon [[File:Stapling.gif]] to increase the number of elements stapled. | ||
| + | |||
| + | To finish, click on the [[File:Stapling_stop.gif]] stop stapling group icon ( at the bottom right will appear the message '''"Stapling finished"''') | ||
| − | |||
[[File:Okm_user_guide_148.jpeg|center]] | [[File:Okm_user_guide_148.jpeg|center]] | ||
[[Category: User Guide]] | [[Category: User Guide]] | ||
Latest revision as of 14:14, 31 October 2011
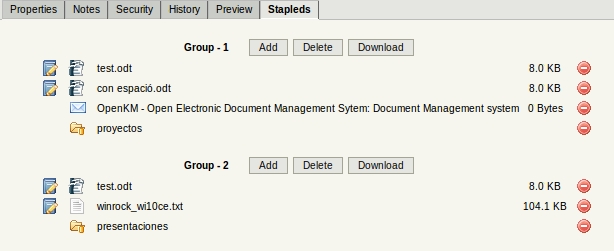
Stapling is only allowed in taxonomy, categories and thesaurus view. Folders, documents and mails can be stapled. Same folder, document or mail can be stapled several times in different groups.
Restrictions:
- Only the stapling creator has privileges to add / delete more elements or deleting entire group. Other users only have downloading option.
- Mails can not be downloaded.
- If some users have no rights to download some document in a stapling, although they can see it in the stapling group, they cannot download that file.
Detail of the functions according to their icons:
-
 → Start new stapling group / Staple element ( same button has both functions ).
 -
 → Stop stapling group.
 -
 → Delete some element in the group.
Add new stapling group
First select some folder, document or email.
| Folder, document or email must be selected in file browser view. |
Click on the ![]() start new stapling group icon ( at the bottom right will appear the message "Stapling started").
start new stapling group icon ( at the bottom right will appear the message "Stapling started").
Then select another folder or document and click again on the same icon ![]() . Both elements are now stapled.
. Both elements are now stapled.
Continue selecting new elements and clicking on the same icon ![]() to increase the number of elements stapled.
to increase the number of elements stapled.
To finish, click on the ![]() stop stapling group icon ( at the bottom right will appear the message "Stapling finished")
stop stapling group icon ( at the bottom right will appear the message "Stapling finished")
Add more elements to a stapling group
Click on the "Add" button in order to select which group you want to add more elements to ( at the bottom right will appear the message "Stapling started").
Continue selecting new elements and clicking on the same icon ![]() to increase the number of elements stapled.
to increase the number of elements stapled.
To finish, click on the ![]() stop stapling group icon ( at the bottom right will appear the message "Stapling finished")
stop stapling group icon ( at the bottom right will appear the message "Stapling finished")
