Difference between revisions of "Taxonomy"
From OpenKM Documentation
| (5 intermediate revisions by 2 users not shown) | |||
| Line 1: | Line 1: | ||
| − | Firstly, on the left of the desktop, is the Folder Tree | + | Firstly, on the left of the desktop, is the Folder Tree, also called the Taxonomy. It displays a view of the repository grouped by folders. There are various types of folders symbolised by the following icons: |
* [[File:Menuitem_empty.gif]] → The folder has no more subfolders | * [[File:Menuitem_empty.gif]] → The folder has no more subfolders | ||
| Line 15: | Line 15: | ||
* Drag & drop. By selecting a document or folder and keeping the left mouse button held permanently down, you can move a document or folder to a node of the tree (Taxonomy). | * Drag & drop. By selecting a document or folder and keeping the left mouse button held permanently down, you can move a document or folder to a node of the tree (Taxonomy). | ||
| + | |||
'''Pop-up menu''' | '''Pop-up menu''' | ||
[[File:Okm_user_guide_015.jpeg]] | [[File:Okm_user_guide_015.jpeg]] | ||
| + | |||
'''Description of the different options''' | '''Description of the different options''' | ||
| Line 24: | Line 26: | ||
* [[File:Delete.gif]] → Delete folder. | * [[File:Delete.gif]] → Delete folder. | ||
* [[File:Rename.gif]] → Change the name of the selected folder. | * [[File:Rename.gif]] → Change the name of the selected folder. | ||
| − | * [[File:Move_folder.gif]] → Change the | + | * [[File:Move_folder.gif]] → Change the location of the selected folder to another position on the tree, together with all the documents and folders it may contain |
* [[File:Copy.gif]] → Duplicate the folder and its contents in another place on the tree. | * [[File:Copy.gif]] → Duplicate the folder and its contents in another place on the tree. | ||
* [[File:Add_document.gif]] → Add new document | * [[File:Add_document.gif]] → Add new document | ||
| Line 30: | Line 32: | ||
* [[File:Bookmark.gif]] → Set the folder or document as user home | * [[File:Bookmark.gif]] → Set the folder or document as user home | ||
* [[File:Export.gif]] → Create a zip file with all the contents of the folder recursively, maintaining the folder structure. | * [[File:Export.gif]] → Create a zip file with all the contents of the folder recursively, maintaining the folder structure. | ||
| + | |||
| + | |||
| + | [[Category: User Guide]] | ||
Latest revision as of 17:57, 20 October 2011
Firstly, on the left of the desktop, is the Folder Tree, also called the Taxonomy. It displays a view of the repository grouped by folders. There are various types of folders symbolised by the following icons:
-
 → The folder has no more subfolders
 -
 → The folder contains subfolders
 -
 → The folder is read-only and has no more subfolders
 -
 → The folder is read-only and contains subfolders
 -
 → You are subscribed to the folder and it has no more subfolders
 -
 → You are subscribed to the folder and it contains subfolders
 -
 → You are subscribed to the folder, it contains no subfolders and is read-only
 -
 → You are subscribed to the folder, it contains subfolders and is read-only
Basic functions with the mouse
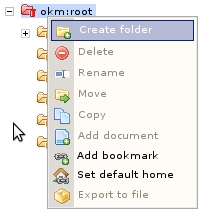
- By clicking with the right mouse button a pop-up menu will appear. In this menu there are options to create new folders, delete, rename, etc.
- Drag & drop. By selecting a document or folder and keeping the left mouse button held permanently down, you can move a document or folder to a node of the tree (Taxonomy).
Pop-up menu
Description of the different options
-
 → Create a new folder
 -
 → Delete folder.
 -
 → Change the name of the selected folder.
 -
 → Change the location of the selected folder to another position on the tree, together with all the documents and folders it may contain
 -
 → Duplicate the folder and its contents in another place on the tree.
 -
 → Add new document
 -
 → Add a folder or document to the bookmarks
 -
 → Set the folder or document as user home
 -
 → Create a zip file with all the contents of the folder recursively, maintaining the folder structure.
