Difference between revisions of "Third-party software integration: Antivirus"
m (→Clamd Service Setup) |
m (→Freshclam Virus Signature Auto Update) |
||
| Line 90: | Line 90: | ||
** Select the General tab and Apply | ** Select the General tab and Apply | ||
| − | === | + | === Freshclam Virus Signature Auto Update === |
We are almost done! | We are almost done! | ||
Revision as of 05:05, 15 December 2011
OpenKM can check if a submitted document is infected. It works with an Open Source antivirus software called ClamAV. Edit OpenKM.cfg and add this line:
system.antivir=/path/to/clamscan
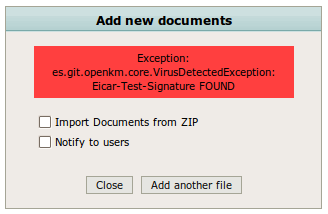
This screenshot shows an error message from OpenKM because the submitted document is infected by a virus:
Debian / Ubuntu
To install ClamAV on Debian / Ubuntu distribution:
$ sudo aptitude install clamav
RedHat / CentOS
To install ClamAV in Centos 5.2 you need more work. First create a file named /etc/yum.repos.d/dag.repo with this content:
[dag]
name=Dag RPM Repository for Red Hat Enterprise Linux
baseurl=http://apt.sw.be/redhat/el$releasever/en/$basearch/dag/
gpgcheck=1
gpgkey=http://dag.wieers.com/packages/RPM-GPG-KEY.dag.txt
enabled=1
Now install the program as root:
$ yum install clamd.i386
Start the daemon:
$ /etc/init.d/clamd start
And update the virus database:
$ freshclam
Windows
To Install and configure ClamAV on Windows:
- Download the newest version (either i386 OR 64 bit) from: http://sourceforge.net/projects/clamav/files/clamav/win32/
- Unpack the ZIP archive and move it to: C:\ so that it appears in your path as: C:\ClamAV
- Copy the example conf files from C:\ClamAV\conf_examples to C:\ClamAV
- Open up a command terminal: Start->Run "cmd"
- Change to the ClamAV directory: "cd C:\ClamAV"
- Run "clamconf.exe", it should complain that you need to edit the example config file. (I included this just so you can check that the files are in the right location)
For DEFAULT MINIMAL configuration (Probably not suitable and you should configure the parameters for your situation) Edit freshclam.conf, clamav-milter.conf and comment "Example". In addition to commenting "Example" in clamd.conf; to enable the local server you will need to change line 80 to: "LocalSocket C:\CLAMAV\clamd.socket"
- Run "clamconf.exe" again, you will get an output of all your configurations.
| Initially you will get a note about being unable to open database, this is because it has not been created yet. |
- Run "mkdir database". If you run clamconf again you will see that the database error is gone and that you have 0 signatures
- Run "freshclam.exe", this will start the initial signature download for ClamAV and may take a few minutes.
At this point you can run "clamd.exe" to check that the server can run manually.
Clamd Service Setup
Now to setup it up so it starts automatically:
- Run "sc create ClamD binPath= C:\Program Files\Windows Resource Kits\Tools\srvany.exe" (yes the space is required in this command and you may have your resource tools in a different location)
It should tell you: [SC] CreateService SUCCESS
- Run "Regedit". Find: HKEY_LOCAL_MACHINE\SYSTEM\CurrentControlSet\Services\ClamD
- Right click on ClamD and create a new Key
- Name the key "Parameters"
- Click on the new Parameters Key, in the right pane create a new String Value
- Name the String Value "Application"
- Right click and Modify Application to: C:\ClamAV\clamd.exe -c C:\ClamAV\clamd.conf
- Close Regedit
- Run "services.msc"
- Find ClamD in the list
- Right click -> Properties
- Change Startup type to: Automatic
- Select the recovery tab and change all three failures to: Restart the Service
- Select the General tab and Apply
Freshclam Virus Signature Auto Update
We are almost done!
- Navigate to: Start->All Programs->Accessories->System Tools->Scheduled Tasks
- Add Scheduled Task
- Next->Browse to C:\ClamAV\freshclam.exe
- Select to Perform this task daily
- Next
- Select a good time to update
- Next
- Enter the user credentials to run as
- Next
- Select open Advance options
- Next
- Alter Run to be: "C\ClamAV\freshclam.exe -c C:\ClamAV\freshclam.conf"
- Select the Settings Tab
- Change the Stop Task to 30 minutes
- Apply
- Ok
Right click and run the freshclam task to make sure you do not have any errors
Finally, you need to set system.antivir=C:\ClamAV\clamscan.exe in OpenKM. Depending on your version you can use the Administration panel or OpenKM.cfg.
If everything is working, the document scanning will work in the OpenKM Windows install!
